
Introduction
Have you ever lost a sale because a customer got confused at checkout or worse, saw an unexpected shipping cost and just left?
You’re not alone. Shipping is one of the biggest pain points for WooCommerce store owners. Get it wrong, and customers abandon their carts. Get it right, and you build trust that keeps people coming back.
Configuring WooCommerce shipping zones and methods might sound technical. But it’s actually pretty straightforward once you understand how it works.
In this guide, you’ll learn exactly how to set up WooCommerce shipping zones and methods. We’ll walk through everything step by step, no coding required. Whether you ship locally, nationally, or internationally, you’ll have a solid setup by the end of this post.
Let’s dive in.
Why Shipping Configuration Really Matters
Here’s the thing: shipping isn’t just a logistics issue. It’s a conversion issue.
According to Baymard Institute, nearly 48% of online shoppers abandon their cart because of unexpected extra costs at checkout. A large chunk of that? Shipping.
When customers see confusing shipping options or no shipping option that matches their location, they panic. They don’t email you to ask questions. They just leave.
That’s real money walking out the door.
And on the flip side, when your shipping is clear, fair, and well-organized, customers feel confident. They complete the purchase. They trust you.
There’s also the operational headache to think about. If you’re shipping to multiple regions, say your home country plus a few international markets, managing different shipping rates manually is exhausting. You end up with errors, overcharges, and unhappy customers.
WooCommerce’s shipping zones and methods system was built to solve exactly these problems. Once it’s set up correctly, it runs on autopilot. Customers see the right options for their location automatically.
That means fewer support emails, fewer abandoned carts, and a smoother experience all around.
How WooCommerce Shipping Zones and Methods Work
Before we jump into setup, let’s quickly understand the two key concepts.
What Is a Shipping Zone?
A shipping zone is a geographic area you define like “United States,” “Europe,” or just “California.” You can be as broad or as specific as you want.
WooCommerce checks the customer’s shipping address and matches it to the right zone automatically. Then it shows only the shipping methods available for that zone.
What Is a Shipping Method?
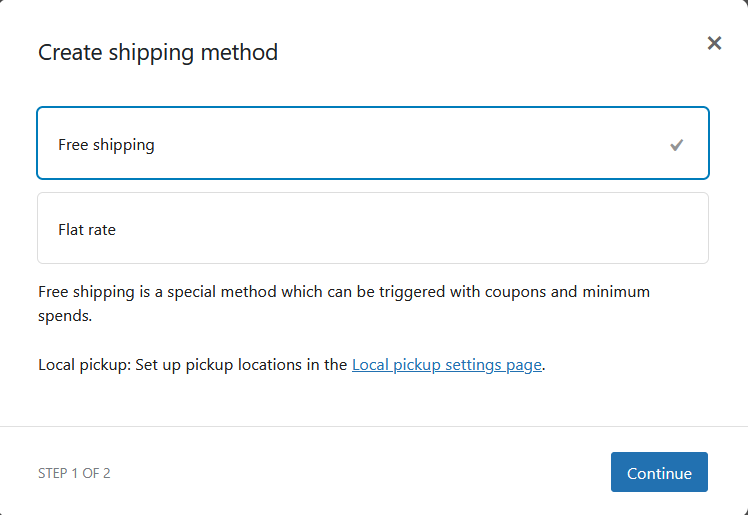
A shipping method is the actual delivery option you offer within a zone. WooCommerce includes three built-in methods:
- Flat Rate: you charge a fixed price (e.g., $5.99 shipping to all US customers)
- Free Shipping: offer free delivery, either always or when conditions are met (like a minimum order)
- Local Pickup: let customers pick up from your store or a specific location
How They Work Together
Think of it like a physical store with different price tags for different customers. A local customer might get free pickup. Someone across the country pays flat-rate shipping. An international buyer sees different options entirely.
WooCommerce matches the customer’s address to your zones, then shows them exactly what applies to them. Clean, automatic, and professional.
Here are the key benefits of setting this up properly:
- Customers only see relevant shipping options
- You control costs per region
- No manual calculations at checkout
- Reduces checkout confusion and cart abandonment
- Scales easily as your store grows
Step-by-Step: How to Configure WooCommerce Shipping Zones and Methods
Ready to set this up? Here’s exactly how to do it. No coding required.
Step 1: Go to WooCommerce Shipping Settings
In your WordPress dashboard, go to WooCommerce → Settings → Shipping. You’ll see a “Shipping zones” tab at the top. Click it.
Step 2: Add Your First Shipping Zone
Click “Add shipping zone.” Give your zone a name (e.g., “United States”) and then select the regions it covers. You can choose entire countries, states, or even specific postcodes.
Step 3: Add a Shipping Method to That Zone
Once your zone is saved, click “Add shipping method.” Choose from Flat Rate, Free Shipping, or Local Pickup. Select the one that fits and click “Add shipping method.”
Step 4: Configure the Method’s Settings
Click the method name to edit it. For Flat Rate, enter your cost. For Free Shipping, set any minimum order requirement if needed. Keep it simple and clear.
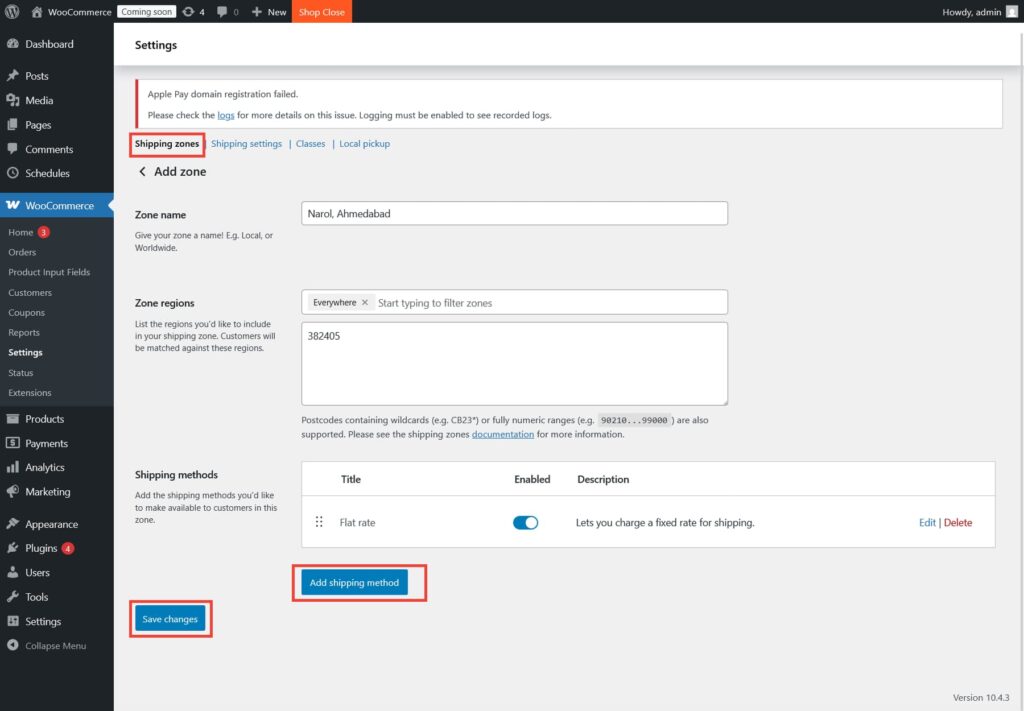
Step 5: Repeat for Each Zone
Create separate zones for each geographic area you ship to. Add appropriate methods to each. If you don’t ship somewhere, simply don’t create a zone for it WooCommerce won’t show shipping options for uncovered regions.
Step 6: Set Up a “Rest of the World” Zone (Optional)
You can create a catch-all zone for locations not covered by your specific zones. This is useful if you want to show a custom message or offer international flat-rate shipping as a fallback.
Step 7: Test It
Go to your store, add a product to the cart, and proceed to checkout. Enter different addresses and confirm the right shipping options appear. Always test before you go live.
Ready to take your store operations even further? If you manage a store with specific business hours or need to pause orders at certain times, check out Open Close Store for WooCommerce. It’s a great complement to a well-configured shipping setup.
Open Close Store for WooCommerce
Real-World Examples: Who Benefits From This Setup
1. A Local Bakery Selling Nationwide
Imagine a small bakery in Chicago. They offer local delivery for nearby zip codes, flat-rate shipping for continental US customers, and they don’t ship internationally yet.
With WooCommerce shipping zones and methods, they create three zones:
- Zone 1: Chicago metro area → Local pickup + local delivery
- Zone 2: Rest of the US → Flat rate ($12.99)
- Zone 3: Rest of the World → No shipping (or a message to contact them)
Customers in Chicago see pickup and local delivery. Customers in Florida see flat-rate. International visitors see no shipping option which prevents botched orders the bakery can’t fulfill.
Result? Fewer failed orders, fewer customer complaints, and a smoother operation.
2. A Fashion Boutique Going Global
A small clothing store wants to ship to the US, Canada, UK, and Australia all with different shipping costs.
They set up one zone per country with tailored flat rates. US customers get $6 shipping. Canadian customers pay $14. UK and Australian customers pay $18.
Because each customer sees only their relevant cost, there’s no sticker shock at checkout. Conversion rates improve. The store owner stops manually quoting shipping in emails.
3. A Digital-Physical Hybrid Store
Some stores sell both digital products and physical ones. For physical products, they ship only within their home country. For digital downloads, shipping isn’t needed at all.
WooCommerce handles this gracefully. You can restrict shipping zones to specific product types, or use a plugin to set more granular rules.
The common thread? Each of these store owners took 30 minutes to set up their zones and saved themselves countless hours of confusion later.
Common Questions About WooCommerce Shipping Zones and Methods
Yes! When you add the Free Shipping method to a zone, you can set it to require a minimum order total. Customers who don’t meet the threshold won’t see the free option they’ll see your other methods instead.
WooCommerce won’t show any shipping methods for that address, and the customer can’t complete checkout. That’s why it’s smart to either create a “Rest of the World” zone or display a clear message. You can also use a plugin to show a custom notice.
Absolutely. You can add Flat Rate, Free Shipping, and Local Pickup to the same zone. Customers will see all available options and choose the one they prefer. More choice often means higher satisfaction.
WooCommerce’s built-in options cover most basic needs. For weight-based pricing, dimensional shipping, or real-time carrier rates, you’ll want a dedicated shipping plugin. The WooCommerce Extensions Store has plenty of options.
Conclusion
Shipping doesn’t have to be complicated. With WooCommerce shipping zones and methods set up correctly, your customers always see the right options for their location automatically.
You reduce confusion at checkout. You cut down on abandoned carts. And you save yourself from fielding endless “how much is shipping?” questions.
Here’s one final tip: revisit your shipping zones every few months. As your store grows or you expand to new markets, your zones should grow with you. A quick review twice a year keeps everything accurate and profitable.
And while you’re optimizing your store experience, don’t miss the chance to streamline your order management too. Order Notification for WooCommerce gives you real-time audio alerts the moment a new order comes in so nothing ever slips through the cracks.
Ready to run a smoother, more professional store?
Try Open Close Store for WooCommerce or Order Notification for WooCommerce with a 14-day money-back guarantee. No risk, fully supported, no coding needed.